Thursday, 30 May 2013

Tantangan KBB # 34 Made In Indonesia -- BIKA AMBON


Pas terima surat cinta KBB # 34 Made in Indonesia ini, pas banget baru ngelahirin anak ke-dua.
Sempat email host dan bilang ada kemungkinan engga bisa ikutan tantangan ini. Namun ternyata, bisa menemukan waktu luang di sela-sela adaptasi dengan my newborn baby.

Tantangan kali ini adalah BIKA AMBON. Seperti yang tertulis di wikipedia : Bika Ambon adalah sejenis penganan asal Indonesia. Terbuat dari bahan-bahan seperti telur, gula, dan santan, bika ambon umumnya dijual dengan rasa pandan, meskipun kini juga tersedia rasa-rasa lainnya seperti durian, keju, dan cokelat. Bika ambon biasanya dapat bertahan dalam kondisi terbaik selama sekitar empat hari karena setelah itu kue tersebut mulai mengeras.

Dua kali nyoba bikin tantangan ini, dua kali pula gagal bikin bika ambonnya bersarang sempurna. Soal rasa sih sudah mendekati karena bika ambon yang asli itu menggunakan tuak enau / nira, sedangkan untuk bika ambon ini tidak menggunakan sama sekali.

Walopun gagal tetap menyetor hasil tantangan ini, masih berusaha untuk bisa mencoba sekali lagi. Membaca hasil diskusi di mailing list, ternyata tips untuk membuat sarangnya sempurna adalah loyang yang digunakan harus panas sekali sebelum kita menuangkan adonannya. Dan sepertinya itulah letak kesalahan sehingga bika ambonnya tidak bersarang sempurna.

Resep :

BIKA AMBON
 
by Rachmah Setyawati

Bahan Biang :
50 gr Tepung Terigu
20 gr Ragi
25 gr Gula Pasir
3 gr Garam Halus
100 ml Air Kelapa

Bahan lainnya :
250 gr Tepung Tapioka/Kanji
12 butir kuning telur
4 butir putih telur
275 gr Gula Pasir

Bahan Cair :
500 ml Santan mentah kental (dari 2 butir kelapa utuh)
2 gr Garam halus
3 btg Serai
8 lbr daun jeruk (buang tulang daunnya)
2 lbr daun pandan

Cara membuat :
1. Aduk bahan biang. Taruh dlm baskom ragi instant, tepung terigu, lalu gula pasir dan garam halus. Tuangi air kelapa, uleni /aduk dengan tangan hingga merata, lalu tutup baskom dengan lap/plastik wrap, diamkan hingga 30-45 menit. Biarkan hingga adonan biang mengembang.


2. Sambil menunggu adonan biang mengembang, masak santan kental beserta garam halus, serai, daun jeruk dan daun pandan , hingga panas saja (tidk sampai mendidih). Sisihkan , biarkan dingin suhu ruang.


3. Kocok semua telur dan gula pasir hingga mengental. Kemudian ambil adonan biang, campurkan dengan tepung tapioka/kanji, aduk menggunakan tangan merata. Lalu tambahkan adonan telur kental tadi ke dalamnya sedikit demi sedikit sambil terus diaduk tangan. Gerakkan telapak tangan naik turun saat mengaduknya (dikeplok-keplok), hingga tercampur merata semua adonan. Kemudian masukkan santan kental yang sudah disaring terlebih dahulu. Aduk rata kembali menggunakan tangan,dgn cara yg sama dikeplok-keplok hingga adonan tercampur rata dengan tekstur yg halus (sekitar hampir 20menit), kemudian diamkan adonan ini hingga 3 jam (tutup atas dgn lap/plastic wrap).


4. Setelah 3 jam, olesi tipis2 seluruh permukaan loyang dgn minyak goreng. Alasi permukaan dasar loyang dgn kertas roti dan poles lagi minyak goreng. 

5. Panaskan oven dengan panas sedang (sekitar 160 derajat celcius) - api bawah saja. Letakkan sejenak loyang tadi sekitar 15 menit di dalam oven, kemudian keluarkan dan tuang adonan ke dalam loyang.


6. Masukkan loyang berisi adonan ke dalam oven, panggang di rak paling bawah, buka sedikit pintu oven , hanya hingga adonan bika ambon dlm loyang sudah terlihat berlubang2 permukaan atasnya (pertanda sudah mulai terbentuk serat pd adonan bika ambon, baru kemudian tutup pintu oven , lanjutkan pemanggangan hingga matang sempurna, sekitar 40-50menit. 
Lakukan tes tusuk untuk lebih menyakinkan apakah kue sdh matang sempurna. Setelah matang, matikan api bawah oven,
Lalu nyalakan api atas, panggang sejenak/hingga permukaan bika ambon terlihat lebih kecoklatan. 

7. Matikan api oven, keluarkan bika ambon, diamkan di suhu ruang hingga dingin, baru kemudian gunakan pisau kecil tajam, untuk membantu mengeluarkan bika ambon dari loyangnya.

Keterangan : untuk loyang kotak ukuran 20X20X7/10cm


Hasil Bika Ambon yang kurang sempurna sarangnya namun tetap enak disantap


Friday, 29 March 2013

Tantangan KBB # 33 Something Artisan : Bagels


Pregnancy & 2nd Challenge of the Year

Working, having 5yo active boy & in the late stage of pregnancy is a challenge. But glad I managed to squeeze time to do 2nd Challenge - Something Artisan : Bagels. Not to mentioned, I also misread the recipe :(

To Make Bagels, it takes at least 2 days. Day 1 for making a dough & Day 2 Baking day.

Bagels recipe
Source : Peter Reinhart : Artisan Breads Every day :  Fast and Easy Recipe for World-Class Breads


Dough Recipe

21 g Barley Malt syrup, Honey or Rice syrup or 7 g Diastatic Malt Powder ( I use Honey)
3g Instant Yeast
10,5 g Salt
255g Lukewarm Water (about 35deg C) -- (I misread the recipe but then managed to top up the water later )
454g Unbleached Bread Flour ( I use Plain Flour)  

Instructions :

 Day 1 ...

- Stir Honey, Yeast, Salt into a lukewarm water, set aside until frothy.

- Pour the flour into a mixing bowl then add yeast mixture. Use a wooden spoon, mixed everything for 3 minutes until everything mixed and smooth. Let it rest for 5 minutes


- Then work the dough on a floured table, knead the dough until smooth and elastic. Put it in the oily bowl & covered it
 

- Proofing the Dough Overnight until its Double in size


Day 2 ...

- Now its time to forming the dough into round shape & make a hole in the middle just like doughnut shape. I use doughnut shaper to help :)

- Take the dough out from the bowl. Form a log then cut it into small size and ready to form into round shape & don't forget to make a hole in the middle. Put on a baking tray with an oily parchment paper to prevent bagels stick to it.


-  Once its ready set aside for 60 - 90 minutes

- After 90minutes, do a ' FLOAT TEST ' to make sure that bagels ready to be boiled. To do the Float   Test - pour a water in a bowl, take one bagels out from the tray  If the bagels sinking take the bagel out from water, dry it and put it back to the tray and let it rest for 15-20 minutes. And if the bagels floating it's mean bagels ready to be boiled


Boiled Dough Recipe 
181 - 272 g Water
28,5g Barley Malt syrup or Honey (I use Honey) 
14g Baking Soda
7g Salt

Instructions  :

   Bring a large pot of water to boil and tip Honey, baking soda and salt, turn down the heat until the water is simmering

- Slip the bagels into the simmering water mixture - make sure not too overcrowded at least 3 at the time. Cook one side for 1-2 minutes and turning over in the water until the bagels have puffed slightly and a skin has formed. Remove with a slotted spoon and drain away any excess water.


-  While you boil the dough, heat up the oven with a temperature around 223ish degree celcius

-  After all bagels boiled, now its time to dipping the topping

Topping Choices
Poppy Seeds
- Sesame Seeds
- 1 White eggs & water 

Instructions :  

- Brushed white eggs & water mixture over the bagels - this is like a glue for a toppping

- Dip the bagels into a topping of your choices - Mine Sesame seeds & Poppy seeds


- Put the bagels back to the tray   

- Now bake it with a temperature around 200ish degree celcius for 8 minutes


- Once its baked, cooling it down on cooling rack
- ready to be served 

The beauty baking a bread is the fresh beautiful smell coming out from the oven that filled the kitchen. I just love the smell :)

Actually this is my first time eating & baking bagels. Taste good need a little work on the dough I guess to make it more fluffy, but overall, not too bad for a first timer like me :)

Enjoy the bagels everyone ....


Friday, 1 February 2013

Tantangan KBB # 32 - Rockin' Rolls


Happy New Year 2013...

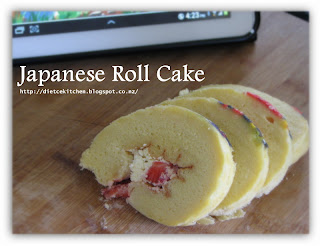
First Challenge in 2013. Baking Japanese Roll Cake. 

As we know, Japanese known as people who always do extra miles in anything including baking. Basically, this roll same like swiss roll but with extra touch by adding a pattern on the top of the roll. 
First person who introduce this japanese roll cake is JUNKO -  you can read her book review here .

The recipe that I use taken from the KBB#32 Rockin' Rolls invite posted on KBB Facebook Group. 
And of course with an adjustment to suit my pattern. The pattern I've choose for this challenge is ANGRY BIRD - since my son love Angry Bird :)

Recipe as below:
Ingredients:

1st Batter
- 4 Eggs yolk
- 40gr Sugar
- 40cc Cooking Oil
- 60cc Water
- 80gr Flour

Batter for a pattern
- 60gr Eggs white
- 15gr Sugar
- 10gr Corn Flour

2nd Batter      
- 160 -175gr Eggs white
- 0.5gr Salt
- 50gr Sugar
- 1tsp Lime juice - I use Lemon Juice due to no lime at home
- 15gr Corn Flour

Filling
- Fresh cream
- Sugar
- Strawberry

Directions:
  
  1. Mix Eggs yolk & sugar till its thick. Keep mixing with a medium speed, pour in cooking oil until mixed well, then pour in water bit by bit. 
  2.  Then add up flour while mixing it at the same time. Once it's mixed well & thick, put aside 
  3. Now we are going to make a batter for a pattern. Mix eggs white & Sugar until puffy. Add up corn flour mixing together with a medium speed until become soft peak.
  4. We need to know how many colours we are going to use to create the pattern, for my Angry Bird pattern, I need 4 Colours - Red, Black, yellow & pink. I take about 5spoons of 1st batter then mix with batter for a pattern, then divided batter into 4 small bowls.
  5. Put the pattern in a baking tin. - I drew pattern on the baking paper that I'm going to use to line the baking tin.  Then, with a toothpick, i started put the colours into my pattern. First black colours applied to frame the red-bird face, then I put it in the oven for 2mins until its become hard - another alternative to shorten the waiting time for the colours to be set. Next step red colours applied, again I put it in the oven for 2mins. Yellow applied same process but only stay in the oven for less than a minute due to only small spot coloured  & last is pink colour. 
  6. Once all the colours set, put aside
  7.  Now we are working on 2nd Batter. Mix Eggs white & sugar until its thick then add a lemon juice mix in a medium speed, add up corn flour until soft peak formed.
  8. Once its ready, pour in a remaining 1st batter into 2nd batter, mixed well with spatula. 
  9. Pour the batter into the baking tin that already have a coloured pattern on. Tap the baking tin to make sure that the batter evenly distributed.
  10. Put it in the oven for 20-25 mins in 165degree celcius heat or until it's baked nicely.
  11. Once cake turning brown, get the cake out from the tin, carefully peel the baking paper - this is the tricky bit, I think I need more practice to peel it. My first attempt, the surface is not really smooth because some of the cake stick onto the baking paper :(  Let it cool.
  12. Making filling, Mixed fresh cream & sugar until soft peak. Cut strawberry into small piece. Put aside
  13.  It's time to put the filling into the cake.Lay a baking paper bigger then the cake size, then put the cake on top it, make sure the brown bit facing up. Then spread the cream evenly. Put the strawberry in the middle. Roll the cake nicely. Wrap in cling wrap. Put it in the freezer for 15mins to make it more firm. It's ready to served - don't forget to cut it into small bite piece :)

My son insist to help me - lucky me, having my own little helper :)

And now I presented Japanese Roll Cake - Red Angry Bird


 Enjoy !!....